Deploy Azure API Management and APIs with one command
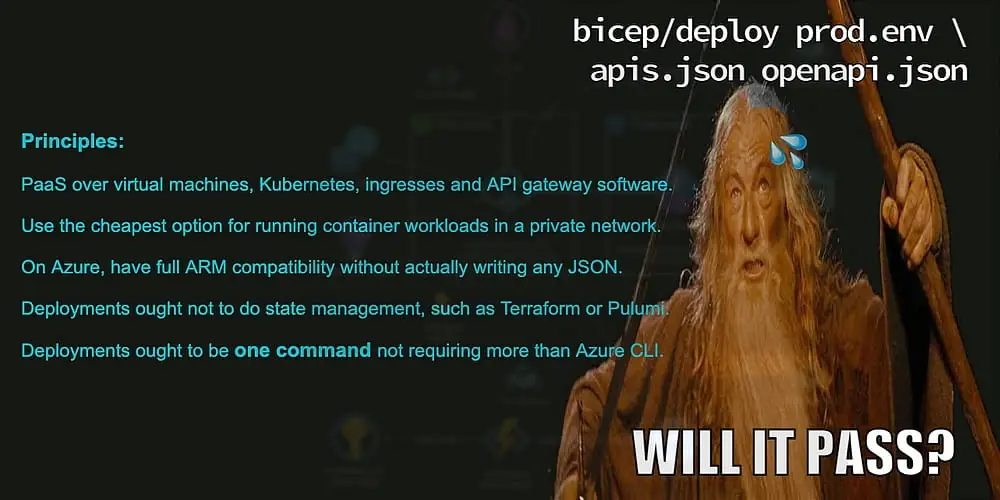
Will it PaaS?

Challenge
Doing so, the UI and UX work can start long before having the backend APIs and infrastructure set up. Thus, we will setup a full solution to achieve this by virtualizing the not-yet-done APIs with Mockoon, which is a free and graphical tool for designing and simulating real APIs (like payment APIs).
I think well-designed tools like Mockoon should be known by larger audience
and be taken into use wide scale, which is why I chose to dockerize Mockoon
(hence the name ‘dockoon’) December 2020. I am glad to see there has already
been

Secondary, we introduce API management, API versioning and release pipelines in the API development from the beginning. By doing so, we neither start inventing those practices just days before going production, nor we lock ourselves up in backwards compatibility issues after app has gone live for customers.
Resolution
This tutorial focuses on getting hands-on experience as fast as possible, without diving deeply into the technical details.
As an outcome, we will have a fully working solution (in an hour) which is intuitive to use even for those so far only familiar with Azure Portal.
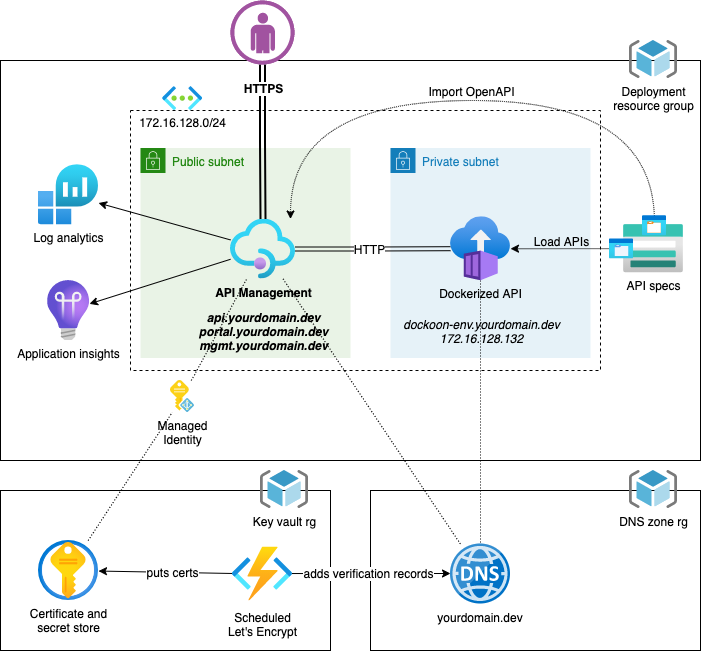
We will create the following stack in your Azure subscription:
- Container Instance for running APIs (we start with an example mock API)
- Storage Account for API specs and a share to use as a container volume mount
- Public API Management service incl. Portal, AppInsights and Log Analytics
- Authenticated HTTPS API from OpenAPI spec, containerized API as the backend
- TLS certificates for HTTPS with automated renewal to a key vault

Prerequisites
If you have an ops background, basic Azure Portal and deployment knowledge is assumed. We will use Azure CLI to transpile Bicep files to ARM under the hood, so as humans, we do not write ARM templates that is effectively JSON.
We use sensible defaults, but knowing DNS, HTTPS and authentication basic for setting up the prerequisites won’t hurt. The sensible defaults are covered in chapters “API management basics” and “API development tips”.
If you are a developer, you will quickly feel comfortable writing Bicep if you want to modify the solution to your own purposes besides the parameters that are provided. In addition, having basic knowledge of OpenAPI specs will help.
Domain name
You must own a domain which has been delegated to an existing public DNS zone in the same Azure subscription where this tutorial will be deployed.
yourdomain.dev in Azure. Note the DNS zone name
and the DNS zone resource group name as you will need it in further steps.Certificate
To use Let’s Encrypt to get free TLS X.509 certificates for your domain(s), and in addition to have them renewed automatically every 90 days, deploy keyvault-acmebot to the Azure subscription, e.g. by using “Deploy to Azure” button in the instructions.
Deployment of acmebot creates a dedicated resource group, a consumption tier Function App and a key vault where the certificates are uploaded after created or renewed.
Proceed according to the steps in
getting started
and finally use /add-certificate endpoint (provides a web UI) to get
a wildcard certificate *.yourdomain.dev.
Tools we will use
Clone the git repository:
git clone https://github.com/asyrjasalo/dockoon.git
cd dockoon/bicep
Azure CLI is assumed present to install or upgrade Bicep:
az bicep install
az bicep upgrade
If you do not have Bash available for your OS, you can clone this repo in Azure Cloud Shell and run the commands there.
Additionally, and if familiar with Azure DevOps, you can import
azure-pipelines.yml in your project and run the pipeline.
Deploy to Azure
Copy prod.env.example to prod.env and configure the variables.
azuredeploy.environment.parameters.json files.Shortcut
To get everything up(dated) with one command according to the steps below:
./deploy prod.env ../apis.json ../openapi.json
dns.bicep and kv.bicep)
will be created in their own configured resource groups and thus visible there.Steps
Export the variables:
set -a; source prod.env; set +a
Create a target resource group:
az group create \
    --name "$AZ_PREFIX-$AZ_ENVIRONMENT-$AZ_APP-rg" \
    --location "$AZ_LOCATION" \
    --subscription "$AZ_SUBSCRIPTION_ID" \
    --tags app="$AZ_APP" environment="$AZ_ENVIRONMENT" owner="$AZ_OWNER"
Create storage account for the API files:
az deployment group create \
    --resource-group "$AZ_PREFIX-$AZ_ENVIRONMENT-$AZ_APP-rg" \
    --subscription "$AZ_SUBSCRIPTION_ID" \
    --template-file sa.bicep \
    -p sa_name="${AZ_PREFIX//-/}${AZ_ENVIRONMENT//-/}${AZ_APP//-/}sa" \
    -p tags="{'app': '$AZ_APP', 'environment': '$AZ_ENVIRONMENT', 'owner': '$AZ_OWNER'}"
Upload apis.json to the storage account file share for the container:
az storage file upload \
    --account-name "${AZ_PREFIX//-/}${AZ_ENVIRONMENT//-/}${AZ_APP//-/}sa" \
    --share-name share \
    --source ../apis.json
Create deployment in the resource group:
az deployment group create \
    --resource-group "$AZ_PREFIX-$AZ_ENVIRONMENT-$AZ_APP-rg" \
    --subscription "$AZ_SUBSCRIPTION_ID" \
    --template-file main.bicep \
    -p prefix="$AZ_PREFIX" \
    -p environment="$AZ_ENVIRONMENT" \
    -p app="$AZ_APP" \
    -p owner="$AZ_OWNER" \
    -p dns_zone_name="$AZ_DNS_ZONE_NAME" \
    -p dns_zone_rg_name="$AZ_DNS_ZONE_RG_NAME" \
    -p key_vault_name="$AZ_KEY_VAULT_NAME" \
    -p key_vault_rg_name="$AZ_KEY_VAULT_RG_NAME" \
    -p key_vault_cert_name="$AZ_KEY_VAULT_CERT_NAME"
Upload openapi.json to the storage account blob container for the APIM:
az storage blob upload \
    --account-name "${AZ_PREFIX//-/}${AZ_ENVIRONMENT//-/}${AZ_APP//-/}sa" \
    --container-name apis \
    --name openapi.json \
    --file ../openapi.json
Deploy (or update) API in APIM from the OpenAPI specification:
az deployment group create \
    --resource-group "$AZ_PREFIX-$AZ_ENVIRONMENT-$AZ_APP-rg" \
    --subscription "$AZ_SUBSCRIPTION_ID" \
    --template-file api.bicep \
    -p apim_name="$AZ_PREFIX-$AZ_ENVIRONMENT-$AZ_APP-apim" \
    -p app_name="$AZ_APP" \
    -p api_backend_url="http://$AZ_APP-$AZ_ENVIRONMENT.$AZ_DNS_ZONE_NAME:8080" \
    -p api_spec="https://${AZ_PREFIX//-/}${AZ_ENVIRONMENT//-/}${AZ_APP//-/}sa.blob.core.windows.net/apis/openapi.json"
After finished, get the product subscription key e.g. via Azure Portal and verify the API responds when called via the API Management Gateway URL:
curl https://api.${AZ_DNS_ZONE_NAME}/dockoon/v1/users \
    --header 'Ocp-Apim-Subscription-Key: {{subscription_key_for_app}}'
API management basics
This chapter summarizes some good operational Azure API Management practices.
Portal
The developer portal (as well as management API) must be explicitly published in the API Management. To publish Developer Portal via Azure portal, browser to API Management -> Portal Overview -> Publish.
Registration
The API is created in the product app_name (which is also created). An API
Management default group named ‘Developers’ is assigned to the product.
To get a subscription key for the API, sign up via your API Management developer portal. Portal signed up user is automatically placed in the group ‘Developers’, thus granting access (and a subscription key) to the product.
Logging
100% of requests are logged into the Log Analytics Workspace regardless if
particular API has logging enabled or not. Similarly Application Insight
metrics are stored in the workspace. You may want to adjust workspace
retention_in_days as the default is 30 days (law.bicep).
API development tips
Deployment of api.bicep includes sensible defaults, such as APIs being
accessible HTTPS only, but based on your purposes you may adjust parameters,
most important of which are listed below.
Version
The API display name is taken from the API spec and the product name is taken
from app_name. You can optionally configure parameters app_description and
app_terms for the product, and api_description for the API.
By default, API version set named ‘v1’ is created and the version is carried
as part of the URL. To deploy a new API version, set e.g. api_version=v2.
Revision
By default, revision 1 is set as current, which may not be desired in
production. If you want to implement canary, create a new revision 2, set
api_set_current=false and set revision 2 as current when suitable.
Subscription
If you want to require no authentication for the particular API deployed,
add api_require_auth=false. Authentication is still required on the product
level for the other APIs that are possibly assigned in the product.
If you want to require no approval from Administrators when new users
subscribe to the product, add app_require_admin_approval=false.
Spec
OpenAPI (3.x), Swagger (2.x) and WSDL specification formats can be imported by
API Management. If are deploying a SOAP API instead of REST, add
api_type=soap and use api_format=wsdl-link with api_spec URL to the XML.
If you want to read api_spec content directly as a parameter,
set api_format to openapi-json, swagger-json or wsdl.
This may or may not work well, depending on your shell and the spec content.
Policy
API management policies can be set on service, product or API levels.
By default, rate-limit policy is created on the API level by api.bicep.
You can set api_policy_xml to override the API level policy as XML content.
To pass an URL to an XML file instead of the content, also set
api_policy_format=rawxml-link.
What’s next?
Having tried several other free and paid alternatives, and also having written
my own mocking tools, I think Mockoon is by far the most intuitive app for both designing API endpoints and virtualizing them unless they are done. You can install and
use it for editing
apis.json for your own purposes. Remember to export to apis.json from UI
before running ./deploy again.
Mockoon can also export openapi.json and I hope this functionality still gets
improved, as e.g. Azure API Management is much stricter regarding the
path parameter definitions (which is intented).
Due this, you may have to edit openapi.json manually before importing the
Mockoon-exported spec in API Management.
If you want to host your own Docker containers in Azure Container Instances,
which you likely want to try out next, you can check main.bicep for the
parameters forwarded to aci.bicep. Include these parameters to the deployment
commands and you are able to configure the container image, the command,
cpu count, memory, etc. After changes, run ./deploy to update the services
(now takes only a few minutes).
You may also want to see how to create the CI/CD pipeline in your own Azure DevOps project.
Which is left as an exercise. □
Good luck and rock on!